Installing PHP 8.1 - Linux
This documentation will teach all the steps necessary for the installation of the PHP 8.1, Apache 2.4 and the Scriptcase using the manual installation in the Linux environment. Doing this kind of installation you will be responsible for configuring all your environment settings and the database extensions as well.
Listed below are the operational systems approved for the Scriptcase usage. Only these distributions below and their derivatives are approved for the Scriptcase installation.
Check the list of the supported operating systems:
- RedHat
- Debian\Ubuntu
- Suse\OpenSuse
NOTE: In case you need to make a manual installation of the Scriptcase using PHP 7.3 in Linux, access the documentation in our knowledge base.
Prerequisites
WARNING: If you already have a Web Server with Apache and PHP 8.1 configured, just go to the SourceGuardian configuration and proceed to manual installation.
To proceed with the installation, you will need to download some files.
Necessaries Files:
- SourceGuardian for Linux (x86 ou x64): Click Here
- Scriptcase (.zip): Click Here
NOTE: Before continue with the installation is recommended that you do not have any other web environment (as XAMP, Zend Server, etc) installed in your operational system. It is recommended to know Linux/Unix environment to use the terminal.
Configuring the PHP - Ubuntu 22.04\Debian 10
Listed below are the necessaries commands for the manual installation of the PHP in the Ubuntu 22.04 or Debian 10. Check correctly the name of the packages in your terminal.
1 - Before run any other command, update your operating system with the following commands:
sudo apt-get update
sudo apt-get upgrade
2 - Run the command sudo apt-get install php8.1 to install the PHP 8.1. After that, accept the dependencies installation.
If you are using any Ubuntu version before 19.10, it’s necessary to add a repository in your operating system to access the PHP 8.1 packages. See how you can do it below:
sudo add-apt-repository ppa:ondrej/php
sudo apt-get update
If you are using any Debian version before Debian 10, it’s necessary to add a repository in your operating system to access the PHP 8.1 packages. See how you can do it below:
sudo apt -y install lsb-release apt-transport-https ca-certificates
sudo wget -O /etc/apt/trusted.gpg.d/php.gpg https://packages.sury.org/php/apt.gpg
echo "deb https://packages.sury.org/php/ $(lsb_release -sc) main" | sudo tee /etc/apt/sources.list.d/php8.1.list
sudo apt-get update
sudo apt-get install php8.1 |
Example:

3 - Check the PHP version running the command: php -v
Example:

4 - Now, install all the extensions below that are required by Scriptcase:
Default Extensions:
sudo apt-get install php8.1-curlsudo apt-get install php8.1-gdsudo apt-get install php8.1-bcmathsudo apt-get install php8.1-cgisudo apt-get install php8.1-ldapsudo apt-get install php8.1-mbstringsudo apt-get install php8.1-xmlsudo apt-get install php8.1-soapsudo apt-get install php8.1-xslsudo apt-get install php8.1-zip
Database Extensions:
| Extension | Driver enabled in Scriptcase |
|---|---|
sudo apt-get install php8.1-pgsql |
PostgreSQL PDO, PostgreSQL 6.3 or below, PostgreSQL 6.4 or above, PostgreSQL 7 or above |
sudo apt-get install php8.1-mysql |
MySQLi, MySQL PDO |
sudo apt-get install php8.1-sqlite3 |
SQLite PDO |
sudo apt-get install php8.1-interbase |
Firebird, Interbase 6, Interbase 6.5, Firebird PDO |
sudo apt-get install php8.1-odbc |
DB2 ODBC GENERIC, DB2 ODBC GENERIC 6, Generic ODBC, MS Access ODBC, Oracle ODBC, Progress, DB2 PDO ODBC, Progress PDO ODBC, Sybase PDO ODBC |
sudo apt-get install php8.1-sybase |
DBLIB, Sybase PDO DBLIB |
NOTE: Some database extensions will depend on third party drivers to be enabled. Click here to access the setup instructions for your database.
5 - Access the php.ini file in the directory /etc/php/8.1/apache2/ and set the recommended values for the PHP directives listed below required by the Scriptcase.
Search for theses directives and set the values as the example:
max_execution_time = 3600max_input_time = 3600max_input_vars = 10000memory_limit = 1024Mpost_max_size = 1024Mupload_max_filesize = 1024Mmax_file_uploads = 200short_open_tag = On
6 - By default, the PHP disable some functions that are required by the Scriptcase. Click here to access the list of these functions.
- Change the line disable_functions as the example below:
disable_functions =
Example:

7 - Set up the PHP TimeZone according your region. Must use the values available in the PHP documentation. Search for the line date.timezone in your php.ini, uncomment and edit according with the TimeZone selected.
Example:
date.timezone = America/Recife
8 - Set up the folders that will store the temporary files. Search for the line ;session.save_path, uncomment and set the path to your temporary folder.
Example:
session.save_path = "/tmp"
9 - Save all the changes made and restart the Apache service using the following command:
sudo service apache2 restart
10 - Check if the changes were made using the file info.php. You will need to create this file and place it in the /var/www/html/ path with the following content.
<?php
phpinfo();
?>
After that, check using your browser the page generated accessing the URL 127.0.0.1/info.php.
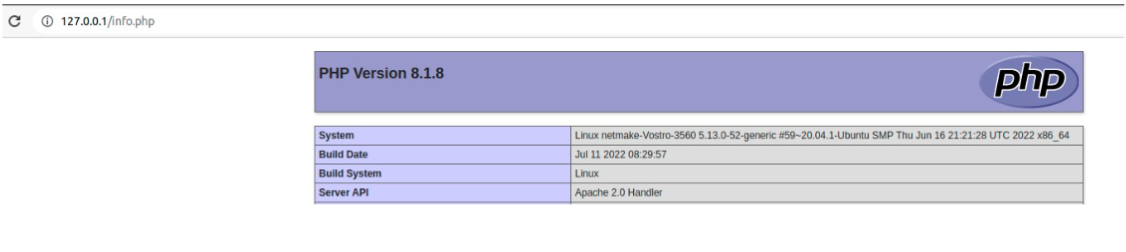
NOTE: For more information about the phpinfo(), check the PHP documentation.
Enabling the SourceGuardian
Before starting the Scriptcase installation, you need to enable the loader used for the Scriptcase encryption in your PHP. Follow the steps below showing how to dot it.
1 - Access the Downloads folder and extract the file downloaded referent to the SourceGuardian at the beggining of this documentation.
Example:
cd /home/User/Downloads
sudo chmod 777 loaders.linux-x86_64.zip && unzip loaders.linux-x86_64.zip
2 - Copy the file ixed.8.1.lin and past in the extension_dir directory of your PHP. We will use the path /usr/lib/php/20210902 for this example.
Example:
| Ubuntu 22.04\Debian 10 |
|---|
/usr/lib/php/20180731 |
sudo cp ixed.8.1.lin /usr/lib/php/20210902
3 - Edit the php.ini file and below the last line set the path to the extension in the zend_extension parameter:
Example:

| Ubuntu 22.04\Debian 10 |
|---|
/etc/php/8.1/apache2/ |
sudo nano /etc/php/8.1/apache2/php.ini
zend_extension = "/usr/lib/php/20210902/ixed.8.1.lin"
4 - Restart the Apache service using the following command:
| Ubuntu 22.04\Debian 10 | |
|---|---|
sudo service apache2 restart |
sudo systemctl restart httpd |
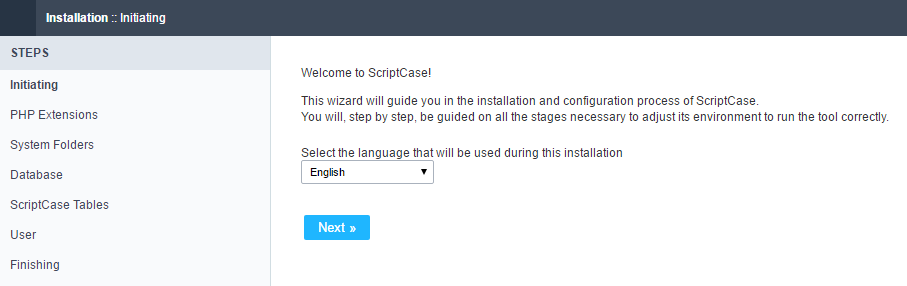
Scriptcase Manual Installation
Listed below are the steps needed to do a Scriptcase manual installation. To do the steps, it is needed that you have a web server configured in your machine.
1 - Download the Scriptcase (.zip) directly from the download page from our website.
2 - Extract the .zip file and rename the extracted folder to scriptcase.
3 - Move the scriptcase to your server root. Depending of your operating system and the installation the path can be different from the example. However, by default the paths are:
| Windows | Server |
|---|---|
C:\Apache24\htdocs\ |
Apache |
C:\inetpub\wwwroot\ |
IIS |
| Linux | Server |
|---|---|
/var/www/html/ |
Linux Local |
/home/$(whoami)/public_html/ |
Linux Server |
| macOS | Server |
|---|---|
/Library/WebServer/Documents |
Apache |
4 - Access the Scriptcase using your browser:
127.0.0.1/scriptcase
- By default the selected language is English.
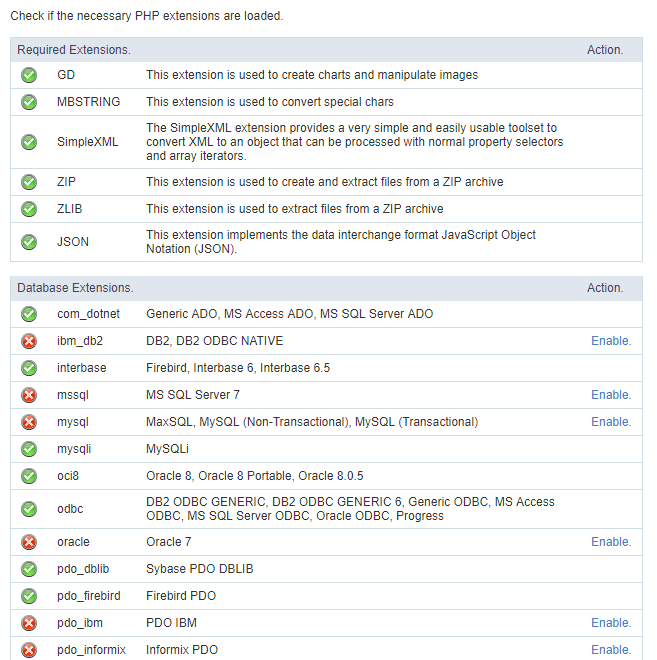
5 - Check the extensions required for Scriptcase to function and database connection modules that are enabled.
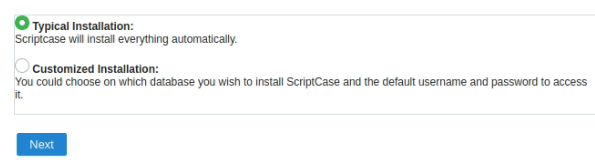
Typical Installation
Check the steps below to complete the manual installation of Scriptcase in a typical way.
NOTE: By selecting this installation, Scriptcase will set your environment by default. Defining the installation database and the login user in Scriptcase.
After clicking proceed, you will be redirected to the Scriptcase Login page.
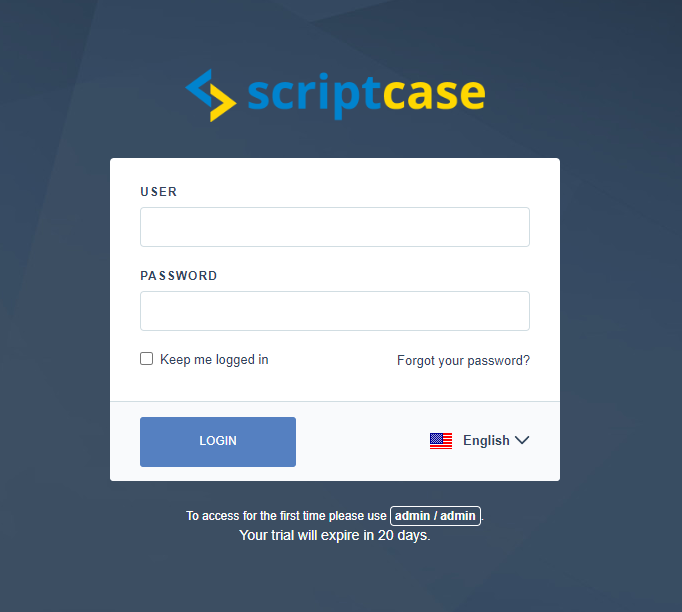
User
In this field, it is necessary to inform the user to login to Scriptcase. By default, the user is admin.
Password
In this field, you must enter the password to login to Scriptcase. By default, the password is admin.
Keep me connected
This option keeps the user logged in until they log out through the Scriptcase interface.
Forgot your password?
By clicking this option, it is possible to recover the password of the informed user. An email will be sent to the user in question so they can access the recovery steps.
Important: You can only perform password recovery if you have configured your SMTP information. To access our documentation showing how to perform this configuration click here.
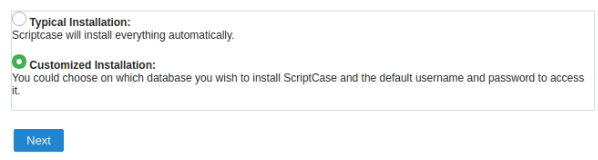
Customized Installation
Check the steps below to complete the manual installation of Scriptcase in a custom manner.
NOTE: By selecting this installation, you will be responsible for setting up your environment. Defining the installation database and the login user for Scriptcase.
1- Verify that the directories required by Scriptcase have the correct permissions. If any directory listed does not have the active check icon ![]() , correct permission for this directory.
, correct permission for this directory.
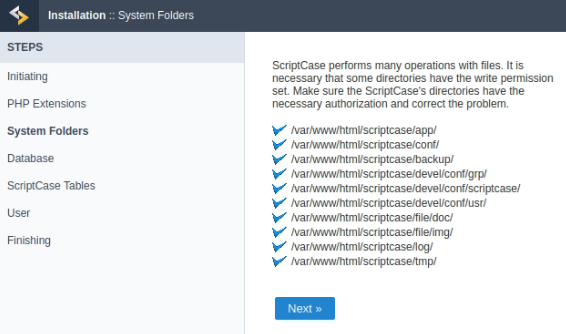
Click proceed to proceed with the installation process .
2- Choose the database where the Scriptcase database will be installed. By default, Scriptcase recommends that it be installed with the SQLite database.
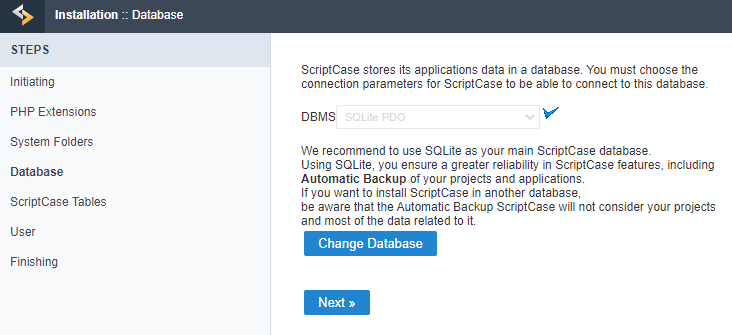
- You can change the default database by clicking the Change Database button. By clicking this option you will need to set the following options:
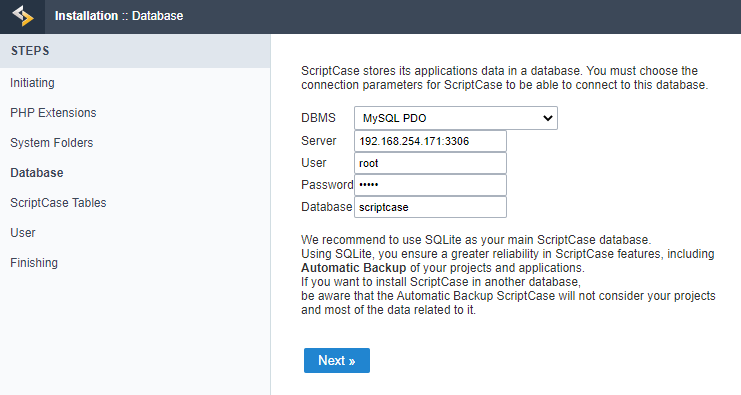
DBMS
In this option, you will select the Driver to connect to your database.
Server
In this option, you will inform the server to connect to the desired database.
User
You need to inform a user who has access to the database you want Scriptcase to be installed on.
Password
You must enter the authentication password corresponding to the entered user.
Database
You must enter the name of the database where Scriptcase will be installed.
Example:
scriptcase
Clique em prosseguir para avançar no processo de instalação.
3 - Verifique se a criação das tabelas da base de dados do Scriptcase ocorreu com sucesso. As tabelas serão marcadas com o ícone de sucesso ![]() na lateral.
na lateral.
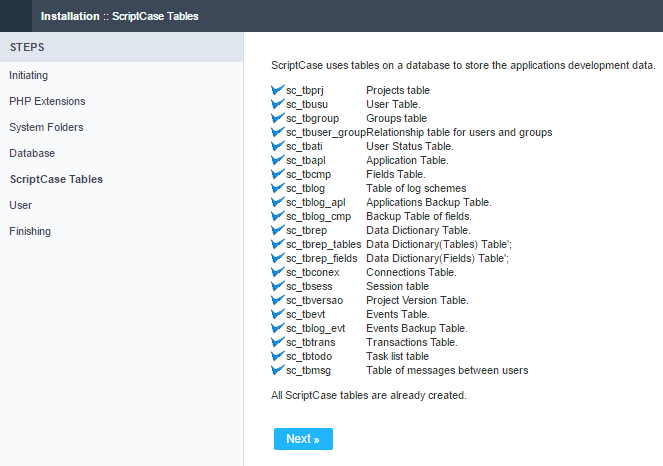
Click proceed to proceed with the installation process.
_4 -__ Set the default user who will have access to Scriptcase.
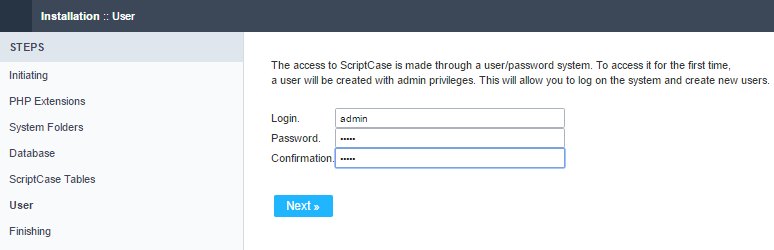
Login
In this option, you will enter the default Scriptcase User Login.
Password
In this option, you must enter the password that will correspond to the user informed.
Confirmation
You must repeat the previously entered password for successful user creation.
Click proceed to proceed with the installation process.
5 - Complete Scriptcase custom installation on your web server.
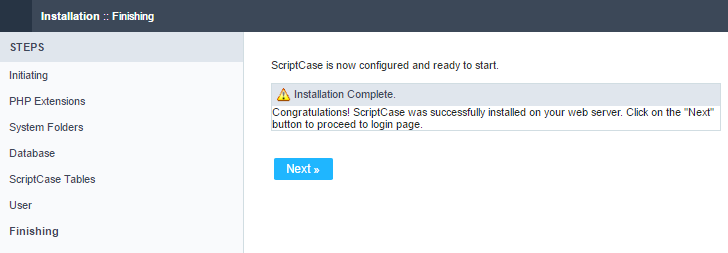
After clicking proceed, you will be redirected to the Scriptcase Login page.
User
In this field, it is necessary to inform the user to login to Scriptcase. By default, the user is admin.
Password
In this field, you must enter the password to login to Scriptcase. By default, the password is admin.
Keep me connected
This option keeps the user logged in until they log out through the Scriptcase interface.
Forgot your password?
By clicking this option, it is possible to recover the password of the informed user. An email will be sent to the user in question so they can access the recovery steps.
Important: You can only perform password recovery if you have configured your SMTP information. To access our documentation showing how to perform this configuration click here.
Do you need to register your Scriptcase? You can access our knowledge base to understand all the steps to register the Scriptcase serial.