Advanced Deploy
Pre-Requirements
NOTE: Verify here the functions that need to be enabled in your PHP for the good functioning from Scriptcase generated applications.
Verify below the requirements for the generated applications by Scriptcase. To guarantee that applications can run in Production Environment.
1 - Web Server to deployment (ex: Apache, IIS).
2 - Correct PHP Version for applications developed in Scriptcase.
Projects developed in Scriptcase with PHP 7.0 or 7.3 are approved to be published in the following versions of PHP:
- PHP 7.0
- PHP 7.1
- PHP 7.2
- PHP 7.3
- PHP 7.4
Projects developed in Scriptcase with PHP 8.1 are approved to be published in the following versions of PHP:
- PHP 7.0
- PHP 7.1
- PHP 7.2
- PHP 7.3
- PHP 7.4
- PHP 8.0
- PHP 8.1
3 - Access to the project database that is going to be used in the production environment.
Different from the typical deploy, where the directories’ setup is done from ScriptCase using the default settings, the advanced deployment allows you to choose the directories is according to the server’s architecture where it is going to be deployed.
Project Deployment
Access your project and choose the option “Project -> Deploy Project”, available on the top menu.

After clicking on the Deploy applications button, you will have the option to deploy all the applications from the project or you can select the applications that you want to deploy.
Select All Applications
When select this option, all the applications of the project will be deployed.

Select the applications individually
This option allow us to select the applications that will be deployed.

List of available applications
During this process, the Scriptcase list all the Applications in the project so you can select the applications that you wish to deploy.

| Option | Description |
|---|---|
| Per type | Selecting this option, you can see the list of applications grouped by your respective type. |
| Per folder | Selecting this option, you can see the list of applications grouped by your respective folder. |
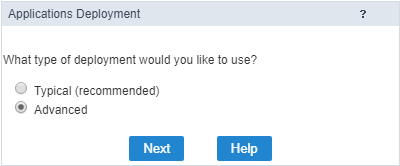
Choose of the deployment type (Advanced)
Next, we need to choose the type of desired deployment.
Create a deployment template to save the defined settings. Or, you can use an existing template to reuse the established settings in your project.
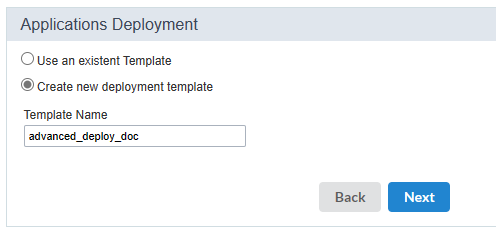
Template Name
This option is necessary to inform the deployment template name that will be used in the project. This option can be reused in future deployments.
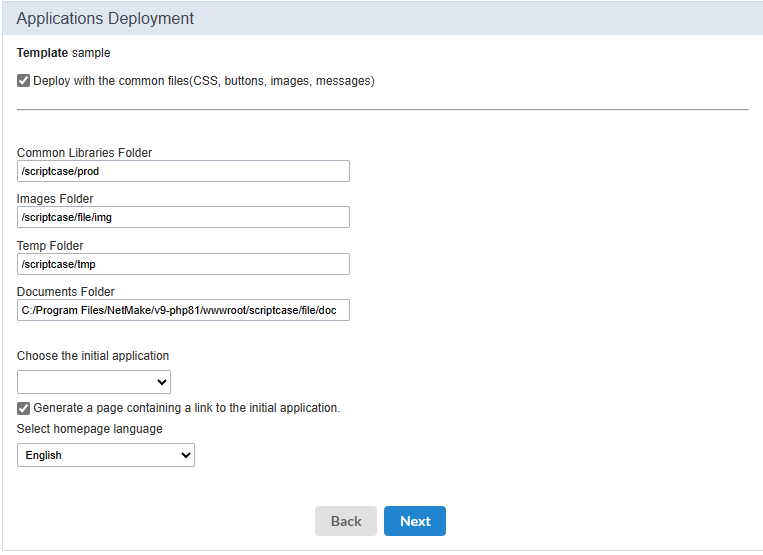
Setting the Advanced Deploy
We must define which application will be the project initial applçication. In this step we also define if we will send the FusionCharts Maps in the deployment file.
NOTE: It is necessary to select correctly the deployment server operating system, allowing the correct generation of the folders structures for deployment.
| Option | Description |
|---|---|
| Deploy with the common files | This option is obligatory for a project deployment, for the images, CSS and customized messages be send in the moment of deploy generation. |
| Publish with FusionChart Maps | Checking this option, the referred files to the FusionCharts library will be added in the deployment file. |
| Publishing server operating system | This option is obligatory for a project deployment, when you select the operating system, the Scriptcase will create the correct structure for your deployment. |
| Common Libraries Folder | It is necessary define the main directory where will be deployed the production environment. By default, the Scriptcase recommends to use: /scriptcase/prod. |
| Images Folder | It is necessary define the directory that will be stored the images in the production environment. By default, the Scriptcase recommends to use: /scriptcase/file/img. |
| Temp Folder | It is necessary define the directory that will be stored the temporary files in the production environment. By default, the Scriptcase recommends to use: /scriptcase/tmp. |
| Documents Folder | It is necessary define the directory that will be stored the documents in the production environment. By default, the Scriptcase recommends to use: /home/$user/public_html/scriptcase/file/doc. Is this option is necessary to inform the absolute path to the documents folder. |
| Choose the Initial Application | Defines the system initial application. |
| Generate link to the Initial application | This resource prevents the creation of a redirect in the production environment and creates an access screen for the initial application defined in the previous attribute. This configuration should prevent the erroneous identification of the system as an insecure page performed by some browsers. |
| Select homepage language | Defines the language of the text that will be displayed on the home page, where the button for accessing the home application will be displayed. |
Defining the production connection name
Define the connection name that will be used by the project after deploying.
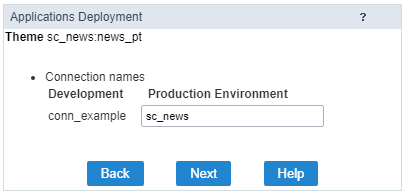
Connection names
In this option, we will inform the names of the connections existents in your project for deployment.
Generated Files
At this stage, the way in which the publication will be carried out will be defined.
- Generate ZIP with applications - In this option, at the end of the publication, a button will be displayed to download the .zip file generated with the publication files. We recommend using it to publish in production environments configured on Windows.
- Generate Tar.Gz with applications - A .Tar.Gz will be generated with the publication files, at the end of the process the file download will be displayed. This type of compression is recommended for publishing in production environments configured on Linux or MacOS.
- Publish to directory on the server - Allows direct publishing to a local directory, where Scriptcase is installed. This type of publication is recommended for servers that share the development and production environment. The publication files will be generated within the indicated folder, therefore, we recommend using an exclusive folder for publication. For example, when indicating the C:\Program Files\NetMake\v9-php81\wwwroot\project_name directory, the application files, and the _lib directory with css and themes will be placed directly in the project_name folder.
- Publish to FTP server - Sends the publication files directly to the configured FTP server. The publication files will be placed in the indicated directory, therefore, we recommend using a specific directory for the publication.
- SFTP - Just like FTP, publishing via SFTP sends the publication files directly to the configured server, placing the publication files in the specified directory.
Generate ZIP or Tar.Gz with applications
The Scriptcase will generate a file Zip or Tar.Gz.
In the end of this process, will be displayed a report of the deployed applications with the download link for download the project.

The file ZIP or Tar.Gz generated, must be decompressed only in the deployment server, to avoid that the files be corrupted.
Deploy on a server directory
Deploys the project in the informed directory. We must inform the absolute path to the deployment directory.

This option should be used in the case that the deploy is going to be in the same sever where ScriptCase is installed, otherwise this option is not valid.
Deploy on FTP server
This option generates the files directly in the FTP remote server.

| Options | Description |
|---|---|
| FTP server | Server where you will deploy your project. Inform the domain or the server’s IP. |
| User | User for the FTP server in the production, remembering that the user need to have permission to write in the server folder, otherwise it will not work. |
| Password | Password for the FTP user. |
| FTP Folder | Server directory where the project will be deployed in. |
To use this option is necessary that you have a server that provides the FTP access and an user with write permissions.
Deploy on a SFTP server
Deploys the application automatically on a remote SFTP server.

| Options | Description |
|---|---|
| SFTP server | Server where you will deploy your project. Inform the domain or the server’s IP. |
| Port | Defines the port that will be used when connecting to the server. |
| User | User for the SFTP server in the production, remembering that the user need to have permission to write in the server folder, otherwise it will not work. |
| Password | Password for the SFTP user. |
| SFTP Folder | Server directory where the project will be deployed in. |
| Compress files before sending | This option defines if the files will be compressed before being sent to the server or if they will be sent one by one. We recommend checking the option so that the files are compressed before sending, in this way the publication tends to be much faster, especially when publishing with a large number of files. |
To use the SFTP option is necessary that the user have permission to write on the server folder.
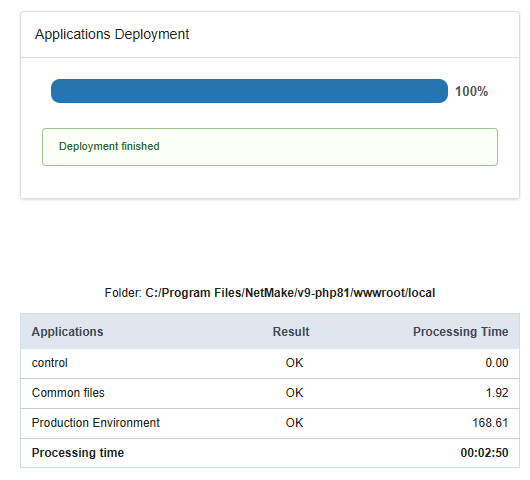
Deployment log
At the end of the process you will receive a report with all the applications deployed and a download link of the project ready to be published.