Enabling Oracle Cloud 8.0.5 or Higher
In Scriptcase, we have the following drivers available for connections with Oracle: Oracle PDO, Oracle 8.0.5 or Higher, Oracle ODBC and Oracle 8. If you are using your own pre-configured environment, Oracle extensions must be manually enabled in PHP.
IMPORTANT: If you are using the automatic installer, the extensions are already configured in PHP, ready to connect if you have enabled them in the installation process. If you have not enabled them, see below how to enable them.
Configuring Oracle Cloud 8.0.5 or Higher on Linux (Automatic installation)
The automatic installation of Scriptcase already comes with the Oracle drivers pre-configured, with only the instant_client to be configured to make the connection. Follow the steps described below to enable connection drivers.
1 - Download the Oracle Instant Client 12.1.0.2 by clicking here.
2 - After downloading, extract the file and copy the folder instantclient into the directory: /opt/Scriptcase/v9-php81/components/drivers/
3 - Restart the Apache
sudo service apachesc9php81 restart
Configuring Oracle Cloud 8.0.5 or Higher on Linux (Manual installation)
Required Files:
- oci8.so extension: Click Here
Ubuntu x64
- Oracle Instant Client - Basic Package 12.1.0.2(x86_64): Click here
- Oracle Instant Client - Devel Package 12.1.0.2(x86_64): Click here
Red-Hat/Centos/OpenSuse
x86_64
- Oracle Instant Client - Basic Package 12.1.0.2(x86_64): Click here
- Oracle Instant Client - Devel Package 12.1.0.2(x86_64): Click here
i386/i686
- Oracle Instant Client - Basic Package 12.1.0.2(i386/i686): Click here
- Oracle Instant Client - Devel Package 12.1.0.2(i386/i686): Click here
WARNING: PHP 8.1 is compatible with Oracle Instant Client 11.2 or Higher.
To download Oracle Instant Client lower than version 19, you must have an Oracle Account.
Other Files
- Oracle Instant Client 12.2.0 or Higher: Click Here
Oracle PDO Driver Compatibility Table
| Drive | Oracle Database Version | |||||||
|---|---|---|---|---|---|---|---|---|
| Oracle 8.0.5 | 9i  |
10g |
11g R1  |
11g R2(11.2) |
12c |
18c |
19c |
|
| Instant Client | Oracle database version | |||||||
| 19.6.0.0 | 9i |
10g |
11g R1 |
11g R2(11.2) |
12c |
18c |
19c |
It is necessary to enable the Oracle extension in PHP and configure Instant_Client to make the connection. Follow the steps described below to enable the connection drivers.
1 - Install the packages below:
| UBUNTU\DEBIAN | CENTOS\RHEL |
|---|---|
sudo apt-get update |
sudo yum update |
sudo apt-get install libaio1 |
sudo yum install libaio-devel |
sudo apt-get install libncurses5 |
sudo yum install libaio |
sudo apt-get install alien |
sudo yum install glibc |
sudo apt-get install gcc-multilib g++-multilib |
sudo yum install compat-libstdc++-33 |
sudo apt-get install libpam0g |
sudo yum install glibc-devel |
sudo apt-get install unixodbc-dev unixodbc |
sudo yum install libstdc++ |
sudo yum install libstdc++ |
|
sudo yum install pam |
|
sudo yum install ncurses-devel |
|
sudo yum install unixODBC |
2 - Convert and install the previously downloaded Instant Client Basic packages on your Linux system:
| UBUNTU\DEBIAN | CENTOS\RHEL |
|---|---|
sudo alien oracle-instantclient12.1-devel-12.1.0.2.0-1.x86_64.rpm |
sudo yum install oracle-instantclient12.1-basic-12.1.0.2.0-1.x86_64.rpm |
sudo alien oracle-instantclient12.1-basic-12.1.0.2.0-1.x86_64.rpm |
sudo yum install oracle-instantclient12.1-devel-12.1.0.2.0-1.x86_64.rpm |
sudo dpkg -i oracle-instantclient12.1-basic_12.1.0.2.0-2_amd64.deb |
|
sudo dpkg -i oracle-instantclient12.1-devel_12.1.0.2.0-2_amd64.deb |
3 - Copy the previously downloaded oci8.so extension to the PHP extensions directory:
E.g. sudo cp oci8.so /usr/lib/php/20180731
Access the info.php file and search for the extension_dir line. It will tell you the exact path to the directory responsible for PHP extensions.

4 - Edit the php.ini file and declare the Oracle extension at the end of the file.
| UBUNTU\DEBIAN | CENTOS\RHEL |
|---|---|
/etc/php/8.1/apache2/php.ini |
/etc/php.ini |
E.g. extension=oci8.so

5 - Edit the environment variable file and declare the variable responsible for identifying the Oracle library:
Enter the variable LD_LIBRARY_PATH and the path to the library in the file responsible for your system’s environment variables. Check the path below according to your operating system:
WARNING: The path to the library may depend on your installation, by default the path is this:
/usr/lib/oracle/12.1/client64/lib/.
| UBUNTU\DEBIAN | CENTOS\RHEL |
|---|---|
sudo nano /etc/apache2/envvars |
sudo nano /etc/sysconfig/httpd |
- Add this variable at the end of the file with the following syntax:
export LD_LIBRARY_PATH=/usr/lib/oracle/12.1/client64/lib/
E.g.

NOTE: If you are using CentOS/RHEL, it is not necessary to use ‘export’ before the variable.
6 - Restart the Scriptcase apache service for the changes to take effect. Use the commands below according to your operating system.
| UBUNTU\DEBIAN | CENTOS\RHEL |
|---|---|
sudo service apache2 restart |
sudo systemctl restart httpd |
Creating a Connection in Scriptcase
See below how to create a connection in your Scriptcase project, using the previously enabled Driver and the Oracle database.
1 - Access any project from your Scriptcase.
2 - Click on the New Connection icon to create a connection.
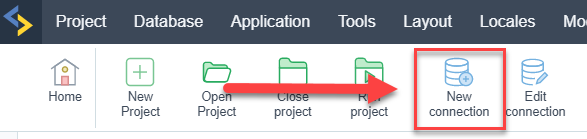
or access the Database > New Connection menu tab.
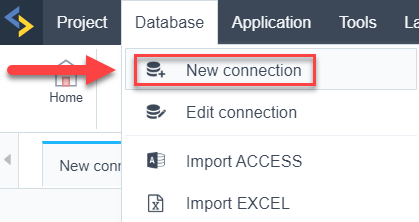
After that, a new page will appear with all database connections.
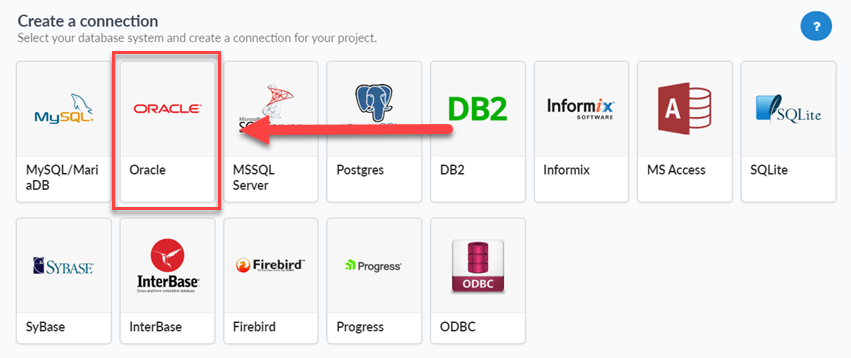
3 - Select the Oracle connection.
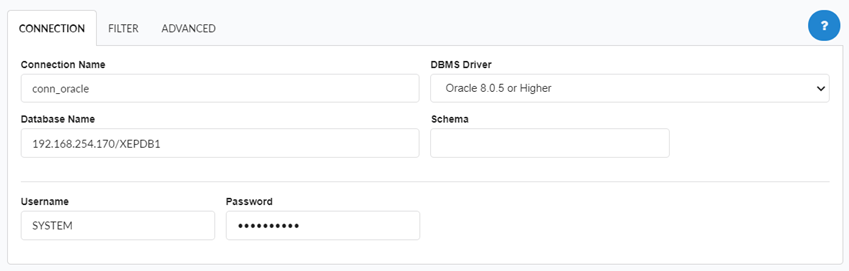
Connection
Enter the parameters for connecting to your Oracle database as follows:
-
Connection Name: Define the name of your new connection. By default, Scriptcase adds the prefix conn along with the database name.
-
DBMS Driver: Select the Oracle Driver used to connect. In this example, we use the Oracle 8.0.5 or Higher Driver.
- Server/Host (Name or IP): Enter the IP or domain of the server where the database is installed along with Service Name.
- E.g.
serverdomain.com/XEor192.168.254.170/XE - For more information about Oracle’s Service Name, click here.
- E.g.
- Schema: Inform the Scheme of specific tables created for the use of the informed user.
- This item is optional if you do not have a schema configured in your database.
- This item is optional if you do not have a schema configured in your database.
- Username: Inform the user to authenticate the connection to your Oracle database.
- For Oracle connections, the user must be capitalized, as in the example.
- For Oracle connections, the user must be capitalized, as in the example.
-
Password: Enter the password to complete the authentication process.
- Test Connection: Click on this button to get a response from the Scriptcase request to find out if the parameters entered are correct.

Filter
Accessing this tab, you can configure which Database items will be displayed on the connection, depending or not on the owner.
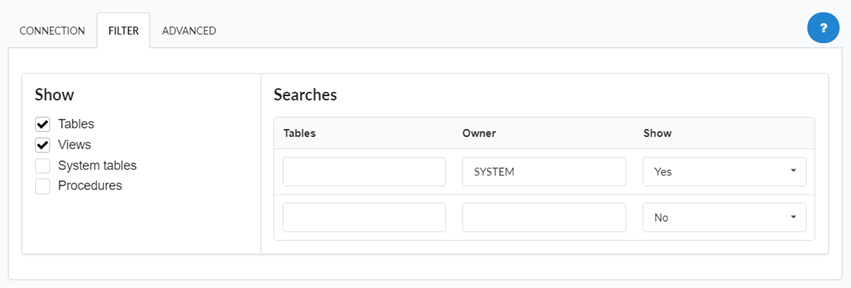
Show
It allows the Oracle connection to see tables, views, system tables and procedures depending on the items selected by the user. By default, the items Tables and Views are already selected by Scriptcase.
- Tables: By selecting this option, the tables in your database will be displayed.
- By default, Scriptcase enables this option.
- By default, Scriptcase enables this option.
- Views: By selecting this option, the views of your database will be displayed.
- By default, Scriptcase enables this option.
- By default, Scriptcase enables this option.
-
System Tables: By selecting this option, the system tables of your database will be displayed.
- Procedures: By selecting this option, the procedures of your database will be displayed.
Searches
Allows you to define which tables and owners are displayed.
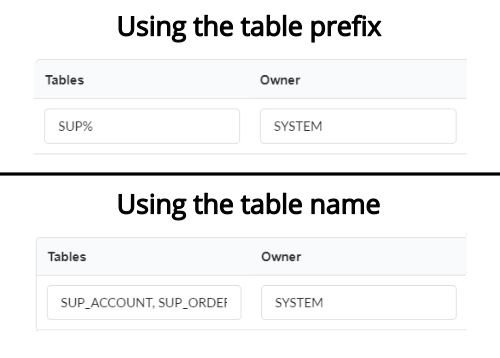
- Tables: You can define in this option which tables will be displayed. The configuration can contain a
PREFIX%or name of the tables to display.- By default, Scriptcase leaves this option empty.
- E.g.
- Owner: Inform the user who sees the tables entered for display.
- The user must be in capital letters as in the example above.
- The user must be in capital letters as in the example above.
- Show: Choose whether tables for the informed owner are displayed.
NOTE: By using table filtering, you eliminate unnecessary tables for your project and improves the performance of your Oracle database connection.
Advanced
In this tab, you have access to specific settings for the connection. The changes made in this session impact the data display and application performance.
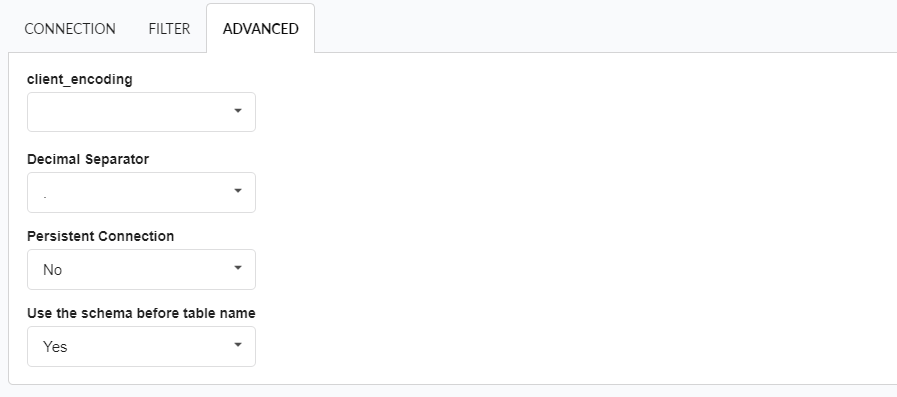
- client_encoding: Select the encoding used in your database. In the example above, we use the client_encoding UTF-8.
- By default, this option is left blank by Scriptcase.
- By default, this option is left blank by Scriptcase.
- Decimal Separator: Select the type of separator for decimal records, between comma and period.
- By default, the period
.is selected as a separator.
- By default, the period
- Persistent Connection: Define whether the connections will be closed after the execution of your scripts in Scriptcase applications.
- By default, Scriptcase disables this option.
- By default, Scriptcase disables this option.
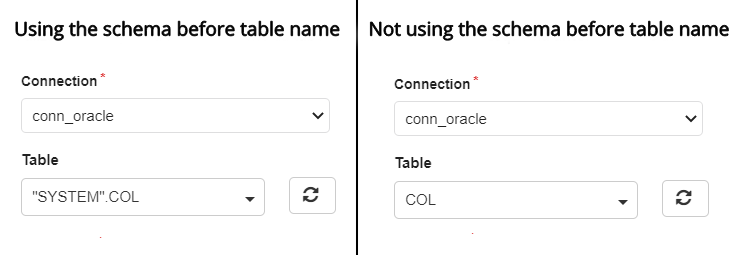
- Use the schema before table name: Define whether the database schema is displayed before the table names.
-
By default, Scriptcase enables this option.
-
E.g.
-
SSH
Here are the SSH options available in the image and their descriptions regarding database connection:
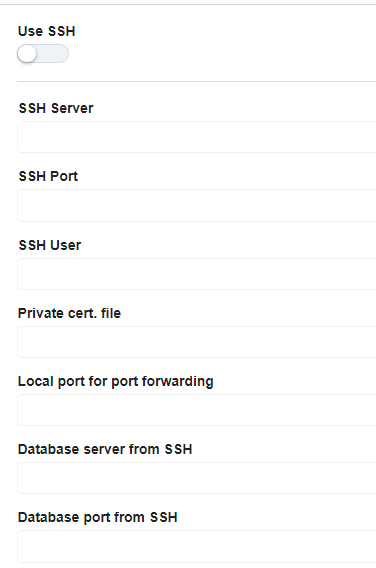
Use SSH
Enables or disables the SSH tunnel for database connection. When enabled, the database connection will be routed through the SSH server.
SSH Server
The IP address or hostname of the SSH server that will be used for tunneling. This is the machine that will act as a bridge to access the database securely.
SSH Port
The port used to connect to the SSH server.
SSH User
The username used to authenticate with the SSH server. This user must have permissions to establish an SSH connection.
Authentication method
You can choose two options: password or certificate. When you choose one of the options, a new field will appear below for the configuration.
Private cert. file
The private key file used for authentication if the SSH server requires key-based authentication instead of a password.
Local port for port forwarding
The local port on the client machine that will be used for forwarding database traffic through the SSH tunnel. This port acts as a bridge between the database client and the remote database.
Database server from SSH
The hostname or IP address of the database server as seen from the SSH server. This is necessary when the database is only accessible within the SSH server’s network.
Database port from SSH
The port of the database server that will be accessed through the SSH tunnel. This should match the database service’s listening port.