Menu Layout Setting
 View video
This module lets you editing display options for the application. You can apply visualization themes, organize blocks, define values, and the display format of the Header and Footer.
Layout Settings
ScriptCase creates an app by using default values defined per project, but you can change those values for a specific application on this interface.
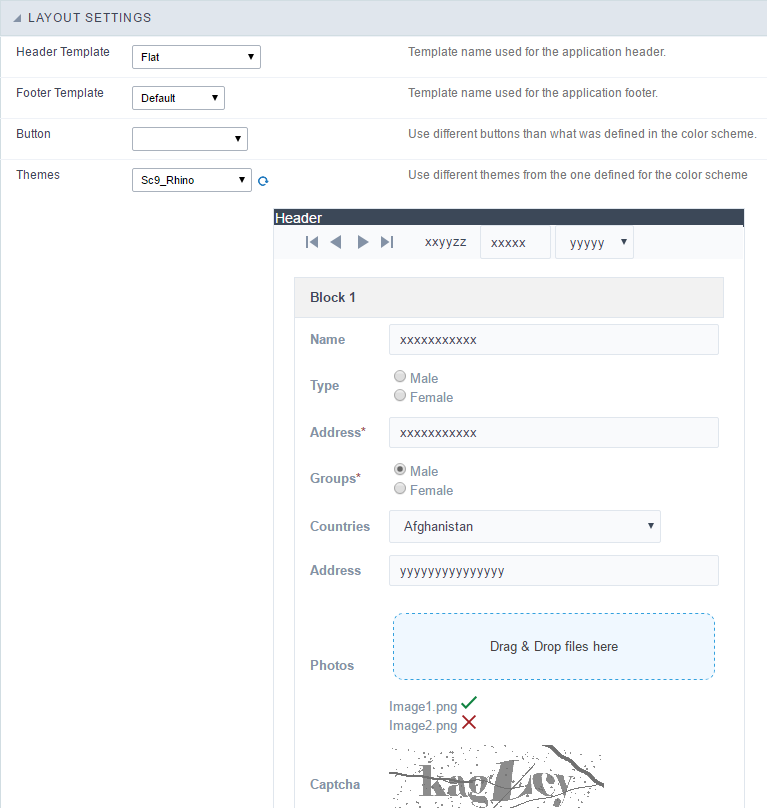 Application Layout Settings
Header Template
Allows choosing the look of the application Header.
Footer Template
Allows choosing the look of the application Footer.
Button
Allows choosing the button theme for the application.
Themes
Choose one of the selected themes in the project properties. It defines the look of the application, like colors, fonts, and others.
Header
Here we can define if we want to display the header or not, the application title, and fill the header variables. The header looks according to the selected template in the Layout settings interface.
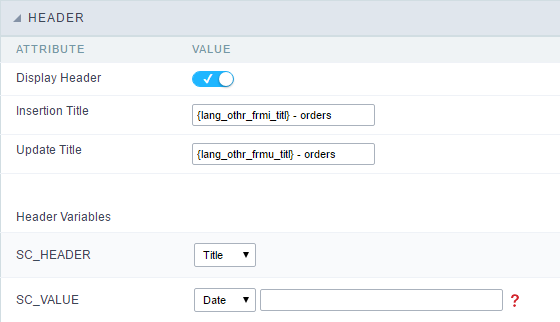 Application Header Configuration
Display Header
This option determines if we want to display the header or not.
Title
Allows informing the title of the application.
Header Variables
We must fill the variable fields with one of the types available in the Combobox. Depending on the type, you need to associate content with it. Those are the types:
- Field: When you choose the option “Field”, it opens a Combobox to choose a field to associate the field value with the header. This option will be enabled in the applications that you can crate a fields
- Title: It displays the value of “Application Title” in the header.
- Date: It displays the system’s date in “yyyy/mm/dd” format in the header. There are several display formats available, and you can change it by using the text field beside it. To access existing formats, click on the hint to see an explanation.
- Image: It displays a field to inform the name of an existing image in the server. You can select an image by clicking on the icon “Choose Image”, and you still can upload new images by using the button “Upload”.
 .
. - Value: It displays the content of the text input. You can inform static texts and “Global Variables”. e.g. “Employee Name: [v_name]”.
Depending on the Application, you may have more than one title option.
Footer
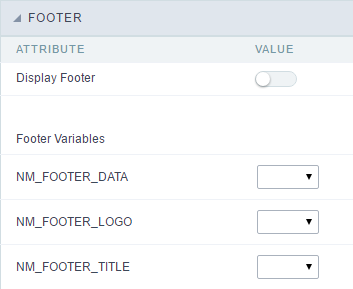 Application Footer Settings
This page may change depending on the footer template chosen in the Layout Settings.
Display Footer
This option determines if we want to display the footer or not.
Footer Variables
We must fill the variable fields with one of the types available in the Combobox. Depending on the type, you need to associate content with it. Those are the types:
- Field: When you choose the option “Field”, it opens a Combobox to choose a field to associate the field value with the header. This option will be enabled in the applications that you can crate a fields
- Date: It displays the system’s date in “yyyy/mm/dd” format in the header. There are several display formats available, and you can change it by using the text field beside it. To access existing formats, click on the hint to see an explanation.
- Image: It displays a field to inform the name of an existing image in the server. You can select an image by clicking on the icon “Choose Image”, and you still can upload new images by using the button “Upload”. .
- Value: It displays the content of the text input. You can inform static texts and “Global Variables”. e.g. “Employee Name: [v_name]”.
Menu Structure
Using this option you can change the entire menu structure.
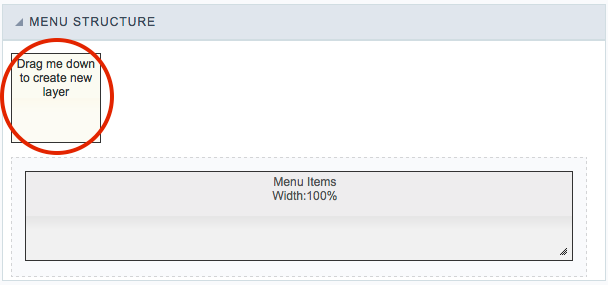
Using this option, you can change the entire menu structure. Drag the selected option to the “Menu Items” area to create a new “Layer” where you can add the contents. You can increase or decrease the layer width and also change its positioning within the “Menu items” area.
After adding the layer and customize its size, you can click on the “pencil” icon to edit the layer options or click on the “trash” icon to delete it.
Layer editing
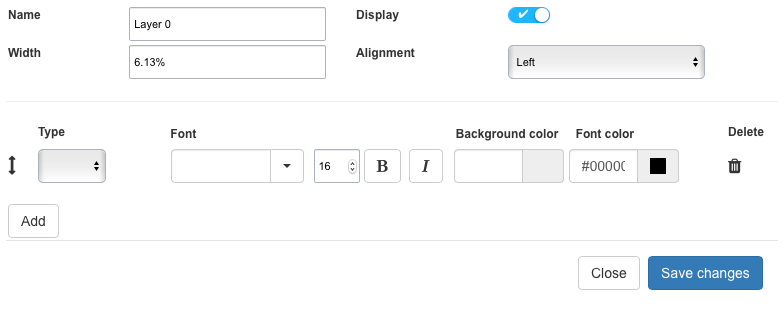
Name
Use this option to set a name for the layer.
Width
It changes the layer size by using percentages or pixels. You need to change the “Menu Width” option within the Menu “Settings”. This value is in percentage as default.
Display
This option sets whether to display the layer or not.
Alignment
Using this option, you can change the alignment of all layer contents in the Left, Right, or Center.
Type
Using this option, you can select the data type of each row of the layer.
*Title: It displays the application title, according to the value set on “Application Title” within the menu “Header & Footer”.
*Date: It displays a date using your preferred date format. Example: d-m-Y
*Image: Add an image to the menu. Use the link to access the Image Manager from Scriptcase to choose an image or upload a new one.
*Value: It displays the content of the text input. You can inform static texts and “Global Variables” such as the logged user, for example: [usr_login].
*Library: Select an External Library from Scriptcase. You can import or create new libraries using the option “Tools » External Libraries” from the Scriptcase main menu.
*Method: Select an application method to apply to the layer. Create new methods by using the option “PHP Programming” within the menu “Programming.”
Font
Select one of the available font families from the list. Change the font size and set the text as bold and/or italic.
Background color
Change the background color of each row of the layer content.
Font color
Change the color for the text in the layer.
Delete
It allows deleting the layer line.
Add
It allows adding another line to the layer.
Close
It closes the edit screen of the layer.
Save
Save all changes for the layer.