Calendar Settings
The Calendar Settings screen allows you to customize various aspects of the application, ensuring better adaptation to project needs.
Through these settings, the developer can adjust the calendar’s behavior, choose which fields will be displayed, define rules for event creation and editing, and configure colors and styles for better visualization.
Settings
Calendar Settings Screen
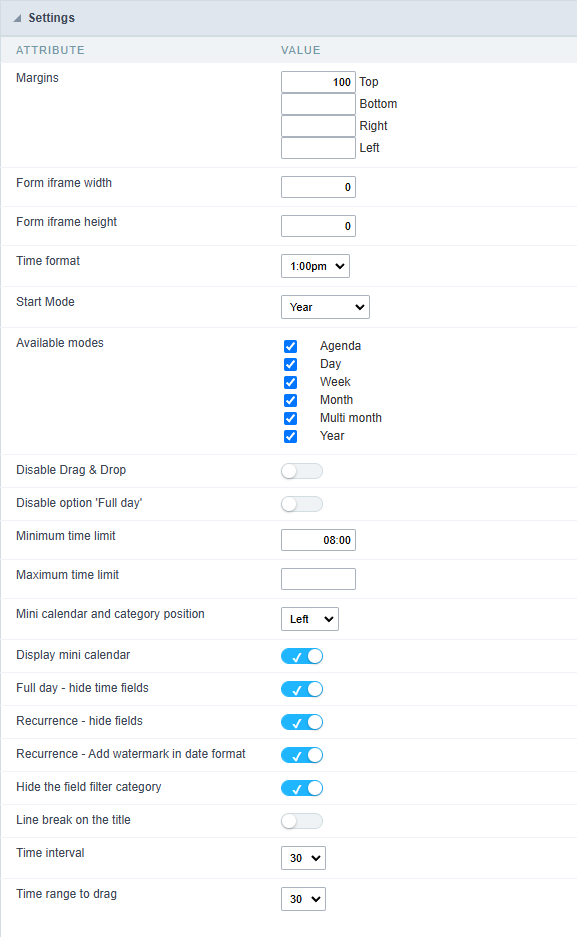
Margins
Allows the developer to set the application’s margin values in pixels. If no value is specified, the application will use the default values from the configured theme.
Attention:
When configuring the Vertical Alignment attribute, the defined margin values will be ignored.
Example of how to use the attribute

Form Iframe Width
Sets the width, in pixels, of the form used to insert events in the Calendar.
Form Iframe Height
Sets the height, in pixels, of the form used to insert events in the Calendar.
Time Format
Defines whether the time display will follow the 12-hour (AM/PM) or 24-hour format, affecting how events are viewed and entered.
- 13:00 - Uses the 24-hour format.
- 1:00 PM - Uses the 12-hour format (AM/PM).
Initial Mode
Defines the default display mode of the calendar, which can be set to: Agenda, Day, Week, Month, Multi-Month, or Year.
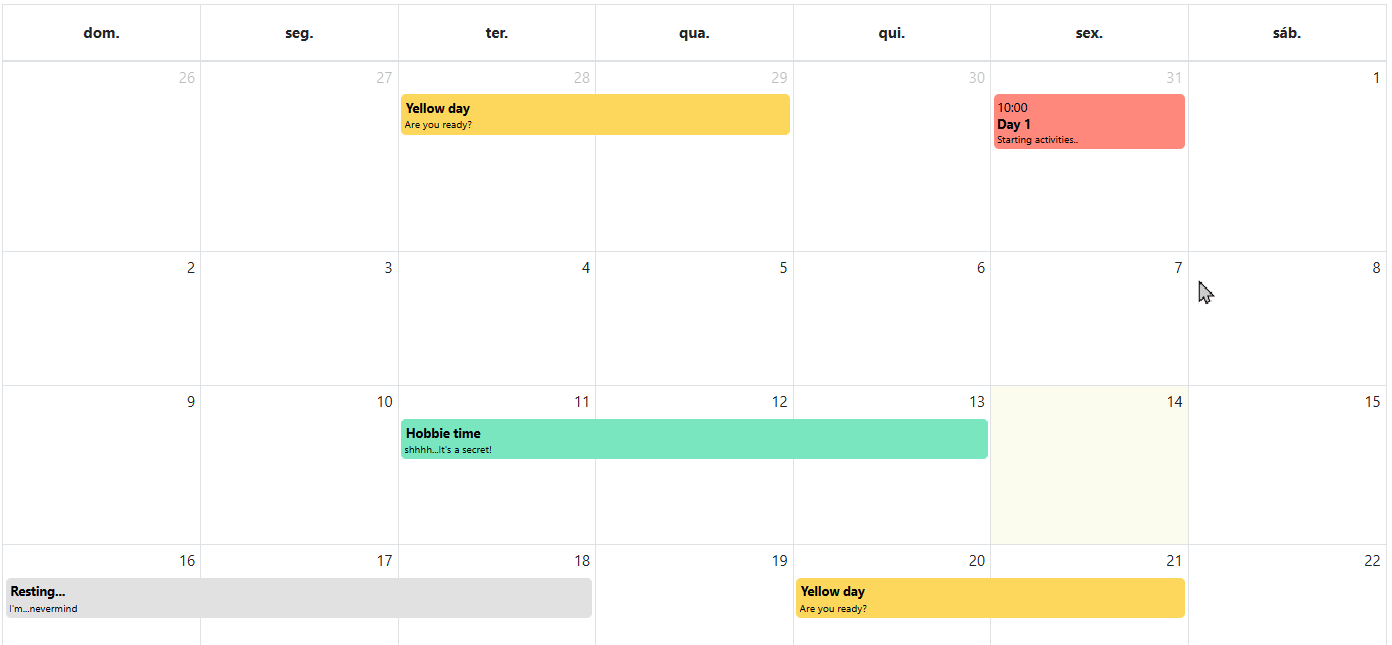
Example of Multi-Month View

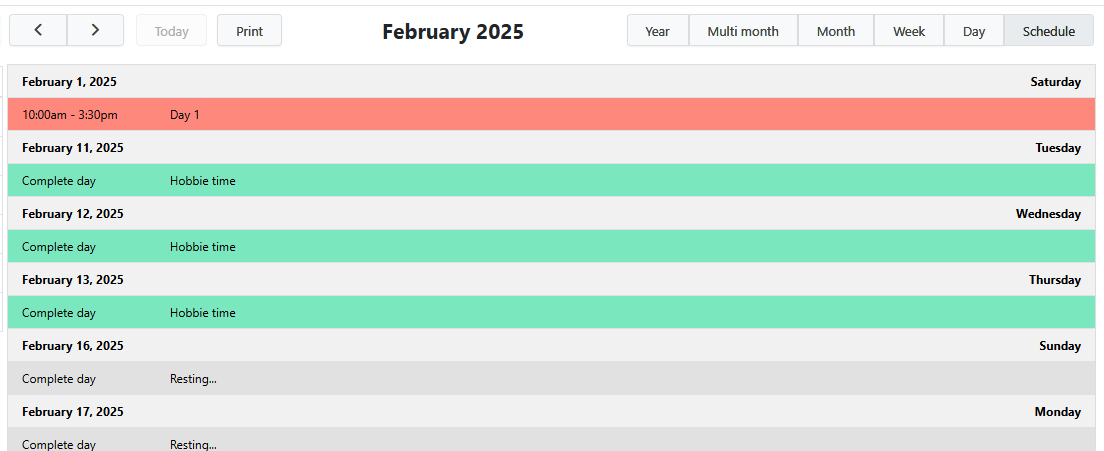
Example of Agenda View
Available Modes
The developer must specify which viewing modes will be available to the end user by deselecting those they do not wish to offer.
Disable Drag & Drop
Disables the Drag & Drop feature for calendar events. Drag & Drop allows updating event dates and times without accessing the edit form.
Example of Drag & Drop Usage
Disable ‘All Day’ Option
Disables the option to set an event as “All Day,” removing the field from the event creation form.
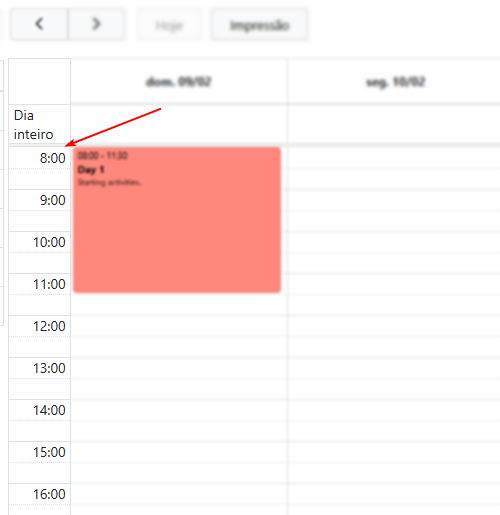
Minimum Time Limit

Sets the earliest time displayed in the Week and Day views of the calendar.
Important:
The specified time must follow the hh:mm format, as shown in the image; otherwise, it will not be considered.
Example Using Initial Time Limit
Maximum Time Limit
Sets the latest time displayed in the Week and Day views, limiting the time available for event creation.
Important:
The specified time must follow the hh:mm format, as shown in the image; otherwise, it will not be considered.
Mini Calendar and Category Position
Determines the position of the Mini Calendar and Categories display column, which can be placed on the left or right side of the main calendar.
The column is displayed when the mini calendar or event categories are in use.
Display Mini Calendar
Enables the Mini Calendar, which allows independent navigation from the main calendar.
All Day - Hide Time Fields
Hides the start and end time fields when marking an event as “All Day” in the event creation form.
If this option is disabled, any values entered in the time fields will be ignored when marking an event as “All Day.”
Recurrence - Hide Fields
Hides the recurrence period and information fields in the event creation form of the Calendar.
Recurrence - Add Date Format Watermark
Displays a watermark in the recurrence date field, helping users identify the expected date format.
Hide Category Field Filter
Hides the Category field filter, preventing users from selecting specific categories for display in the Calendar.
Line Break in Title
Enables automatic line breaks in event titles when the text exceeds the available space.
Time Interval
Defines the time interval, in minutes, used to structure events in the Week and Day views.
Time Interval for Dragging
Specifies the time interval applied when creating or moving events in the Day and Week views. If this value is greater than the one set in the Time Interval attribute, it will automatically adjust to the lower value.
Calendar Fields
This interface displays the fields relationship that will be used in the application.
You need to relate the table fields to the form application fields.
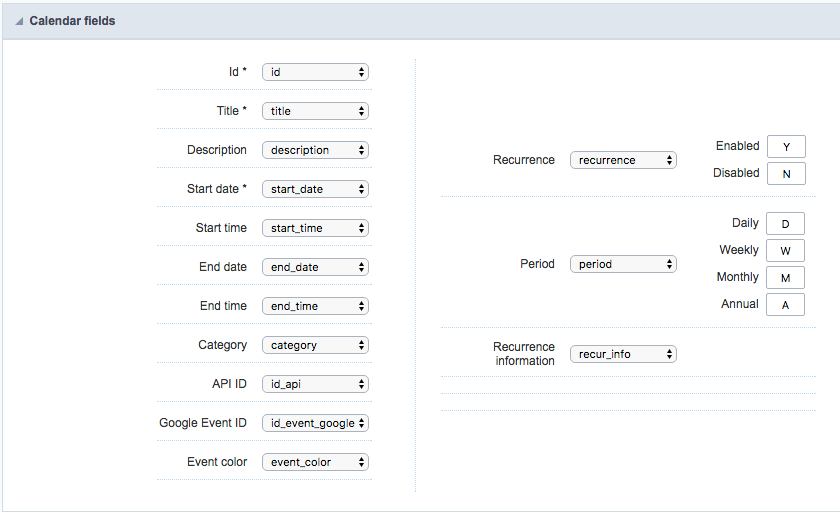 Calendar Fields Settings Screen
Google API
The Google Calendar API will allow you to synchronize your Google calendar with the application developed in Scriptcase.
First you must activate the Google Calendar API by clicking on https://console.developers.google.com/apis/api/calendar-json.googleapis.com/overview.
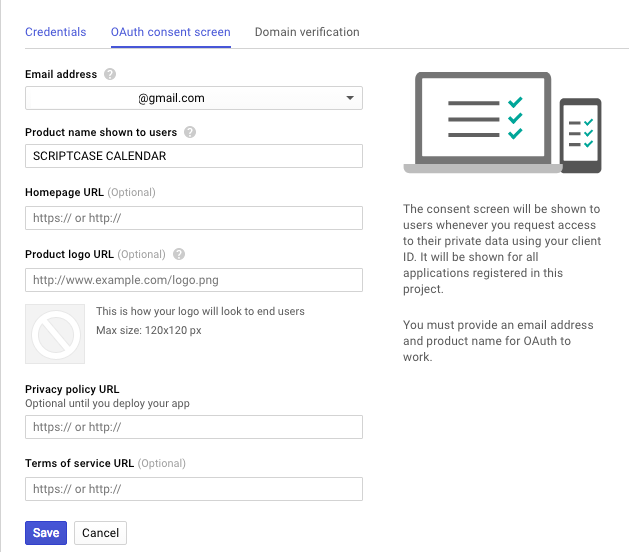
After activation you need to configure the “OAuth consent screen” by clicking on https://console.developers.google.com/apis/credentials/consent.
 OAuth consent screen
- E-mail Address : Select the email that will be used as the source for the google calendar. The application will use this data for synchronization.
- Product name shown to users : Allows you to enter the consent name that will be displayed to the clients. Make sure the name accurately describes your product and be careful not to use names that suggest that the product is from Google or another company.
- Home URL : Allows you to enter a URL to homepage. (optional)
- Product Logo URL : Lets you enter a URL that contains an image that will serve as the product logo. (optional)
- Privacy Policy URL : Lets you enter the URL of the product privacy policy. (optional)
- Terms of Service URL : Lets you inform the URL of the terms of service of the product. (optional)
Note: You only need to inform the e-mail address and the product name. All other items are optional.
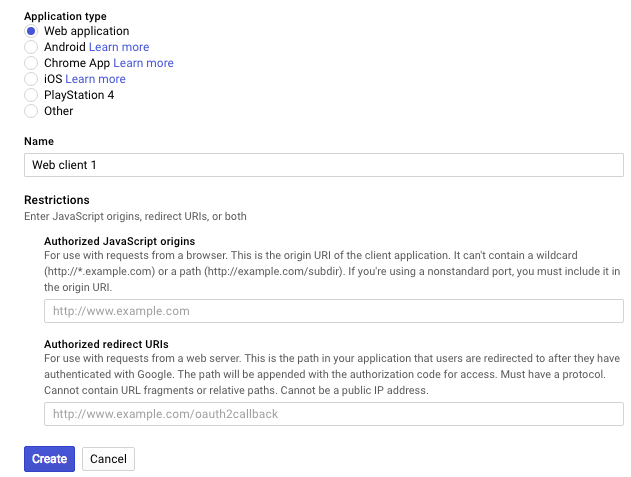
Now you need to create aCredential> OAuth client ID
Select the “Web Application” option and follow the setup below.
 OAuth Client ID Configuration Screen
- Name: Enter a name for the OAuth client ID.
- Authorized JavaScripts Origins : Insert the root URL of your system. For example: http://yourdomain.com or http://localhost
- Authorized redirect URLs : Enter the full URL until your calendar application.
After entering the above data, click “Save.”
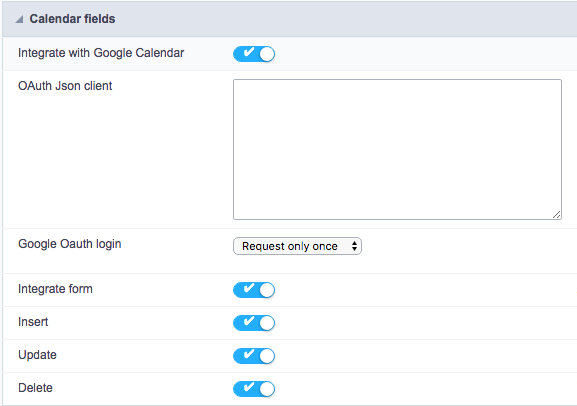
Now let’s configure the Scriptcase application.
 Google Calendar API Settings Screen
- Integrate with Google Calendar: Synchronize with Google calendar events, allowing you to import or export events.
- OAuth Client Json : Json from Google OAuth with the credential to access the project. To get this content, open the OAuth Client ID of the previously configured OAuth__ client and download the JSON.
- Login on Google OAuth : Choose if you want to store the login made in the application to not ask again or if you will request session authentication.
- Integrate form : Enables the form to insert, delete or update events in Google Calendar.
- Insert : When inserting an event in the form, it also inserts in google calendar.
- Update: When updating an event on the form, it also updates in google calendar. * Delete: When deleting an event in the form, it also excludes in the google calendar.